How to create a live stream on your website
For a live stream you will need an IP camera that supports RTSP and an internet connection. Once the camera is connected, rtsp.me will produce ready-made player code that you can place on your website.
Below we describe the preferred option — a direct connection through a static public IP address. If such an address is not available, we will suggest an alternative.
Test your RTSP link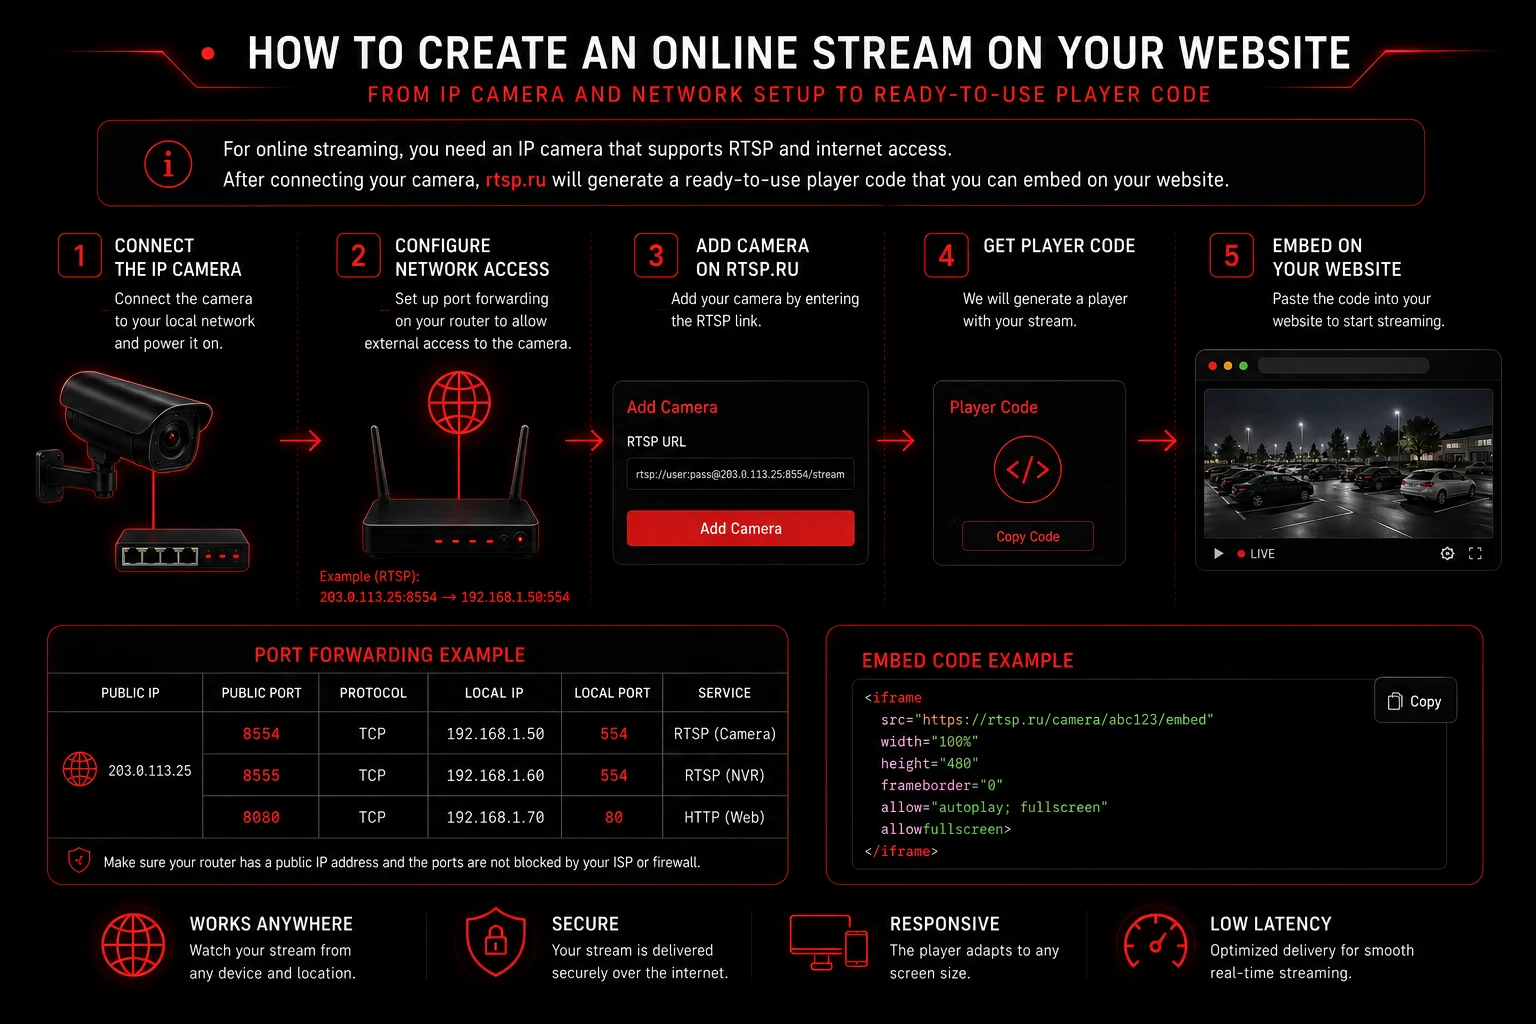
What you will need
Before you start, make sure the camera is powered on, connected to the router by cable or Wi-Fi, and showing video in the manufacturer's app or in your local video surveillance system.
- IP cameraA model that supports the RTSP protocol, with a known login and password
- InternetA stable connection with enough upload speed
- Router accessCredentials for setting up port mapping
- Your websiteThe ability to add the HTML player code you are given
Step 1. Get a static IP
Ask your internet provider whether you can have a static public IP address. The word “public” is the important one: an address behind CGNAT will not let the service connect to the camera directly.
Once it is set up, make a note of the external IP address you have been given. It will be used in the RTSP link instead of the camera's local address.
Step 2. Find the camera on the network
Find out the camera model and its local IP address. It usually looks like 192.168.1.100 or 192.168.0.100. You can look the address up in the router interface, the manufacturer's app or a device discovery tool.
Make a note of four values:
- the exact model and manufacturer of the camera;
- the camera's local IP address;
- the camera user's login and password;
- the local RTSP port — 554 is often the default.
So that the camera's address does not change after a reboot, reserve it in the router's DHCP settings or assign a permanent address in the way that is correct for your network.
Step 3. Set up port mapping
Ask your system administrator to configure the router to forward an external TCP port to the camera's local RTSP port. In the router interface this section may be called Port Mapping, Port Forwarding, Virtual Server or NAT.
For example, external port 10554 can be forwarded to 192.168.1.100:554. You do not have to use the standard port 554 on the outside.
If you have no system administrator, use the guide “How to set up port mapping”, which has examples for popular routers. You can also get in touch with us — we will do our best to help with the setup.
Step 4. Build the RTSP link
An RTSP link usually contains the login, the password, the public IP address, the external port and the path to the video stream:
The exact path after the port depends on the manufacturer, the model, the firmware and the stream you choose. Common examples are given below; replace the values in angle brackets with your own details and check against your camera's documentation.
- Hikvision:
rtsp://<login>:<password>@<ip>:<port>/Streaming/Channels/101 - Dahua:
rtsp://<login>:<password>@<ip>:<port>/cam/realmonitor?channel=1&subtype=0 - Axis:
rtsp://<login>:<password>@<ip>:<port>/axis-media/media.amp - Reolink:
rtsp://<login>:<password>@<ip>:<port>/h264Preview_01_main - TP-Link Tapo:
rtsp://<login>:<password>@<ip>:<port>/stream1
The main stream is usually marked main, 101 or subtype=0, and the secondary stream sub, 102 or subtype=1. For a website the secondary stream often loads faster and needs less upload speed.
If your camera is not on the list, send us its exact model or look for the RTSP URL section in the manufacturer's documentation.
Step 5. Test the stream
Open the rtsp.me home page, paste the RTSP link you have built into the test field and click “Test”.
If the test fails, check the external IP, the port, the camera's local address, the login, the password and the stream path one by one. Sometimes the provider blocks incoming connections or uses CGNAT.
Step 6. Publish the stream
Once the test passes, add the camera to rtsp.me. The service converts the RTSP stream into a format for modern browsers and gives you ready-made HTML player code.
Place the code where you want it on the page using your site editor, or pass it to your developer. The detailed procedure, visit statistics and secure integration through PHP are covered in the guide “How to embed a stream on your website”.
After publishing, check playback on a computer and on a smartphone.
If you have no static public IP
First ask your provider which kind of address is in use: a dynamic public IP or an address behind CGNAT. That determines how you connect.
Option 1. Dynamic public IP and DDNS
If you do have a public IP but it changes from time to time, you can use a DDNS service — a dynamic domain name that automatically points to your router's current IP.
- Choose a DDNS service, or use the one built into your router.
- Create a domain name, for example mycamera.example-ddns.org.
- Set up DDNS updates on the router.
- Forward an external port to the camera's RTSP port.
- Use the DDNS name instead of the IP address in the RTSP link.
DDNS does not help with CGNAT: your router must receive a public address that is reachable from the internet.
Option 2. No public IP at all
If your provider uses CGNAT, an incoming connection to the camera and ordinary port mapping will not work. In that case you can choose one of the options where the connection is initiated from your own local network:
- An rtsp.me camera. A ready-made device with a suitable connection method and setup support.
- MyVMS Bridge. Connects an existing camera from the local network without opening the RTSP port to the internet.
- RTMP Push. If your camera can send an RTMP stream, use the guide “RTMP Push without a static IP”.
Contact rtsp.me support, tell us the camera model and the type of internet connection, and we will help you choose the right option.
Frequently asked questions
Test your RTSP camera
Prepare the RTSP link, check that the stream is reachable and get a ready-made live stream for your website.
Go to the test